 HuiTong
  2025-06-13
Reasons for the cracking of the stick weld
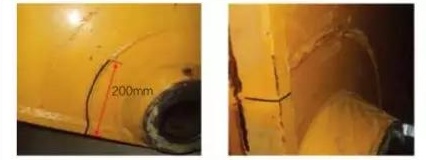
The root of the stick is a fan-shaped sleeve (hole III), the joint part of the side plate and the lower cover plate. The fan-shaped sleeve is designed as a forging part due to the need for strength. Its rigidity and strength are greater than that of the plate welded to it, which causes stress concentration here. At the same time, when welding here, the welding seams of the fan-shaped sleeve, the side plate and the lower cover plate are combined, and the welding seam gap is uneven, resulting in welding defects. This is the main cause of stick fracture. Figure 3 shows the cracking of the butt weld between the shaft seat of the stick root and the side plate.

Weld crack repair process
(1) Clean up cracks in the base material
This time we take the cracking of the butt weld between the shaft seat of the stick root and the side plate as an example to describe the repair process. Before repairing cracked welds, the cleaning work to be done is as follows.
First of all, turn the stick upside down so that the crack of the base material faces upwards for easy handling.
Secondly, use an angle grinder to remove the paint on the surface of the cracked area and the surrounding area. The degree of polishing is subject to the luster of the base material. Do not damage the base material.
Finally, air gouging is started from the end of the base material until the cracks are completely removed and extended by 10-15mm as a uniform transition area to ensure the removal of the cracks. The gouging depth is consistent with the thickness of the base material, and the gouging area is treated into a butt weld groove with an angle of 45°~60°, and then the slag is polished to remove the carburized layer.

(2) Butt weld of welding side plate
It adopts single-side welding and double-side forming welding seam, starting the arc from the end surface arcing plate, 1 pass of bottom welding, 1 layer of filling welding, and 1 pass of cover welding. Note when welding: Weld after removing the slag between layers, and keep the remaining height of the weld within 2mm. After the welding seam is welded, the welding seam should be polished smoothly without damaging the base material.
3) Welding the welding seam of the root shaft seat of the stick
First, flip the stick to lay it flat, with the area to be welded facing upwards. Secondly, gouging is used to remove root cracks at the root of the stick. Refer to Table 3 for its requirements. The gouging sequence is from bottom to top. Once again, start the arc welding from the lower part of the fan-shaped sleeve, make one pass for bottom welding, one layer for filling welding, and one pass for cover welding. Finally, after the weld is completed, the weld should be polished smoothly, and the base material should not be damaged during polishing. During welding, attention should be paid to removing the slag between the layers before welding, and the remaining height of the weld should be kept within 2mm.

(4) Follow-up processing
Clean and polish the weld repair area to ensure the appearance quality. Use a hammer to moderately hit the weld repair area to eliminate stress. 24 hours after the repair is completed, non-destructive flaw detection can be performed on the repaired area to check the quality of weld repair.
After repairing the stick according to the above repairing process, the shaft hole size, shape tolerance and accuracy are tested, and all meet the design requirements. After UT flaw detection, the quality of repaired welds meets the design requirements. The stick repair process can be applied to the repair of excavating mobile arms, and can also be used as a reference for remanufacturing of excavator working devices.